Vintage Tea Cart Painted with a Fun Pattern
This tea cart was made in the 1960's and is in good shape for its age.
I painted the four support spindles as well while it was upside down to assure that I got in all the nooks and crannies. I did a few touch ups after I flipped it right side up.
Next I turned it upright and finished painting a base coat of Coco on the top and two shelves. I planned to have a worn vintage look for the final finish, so I only used one coat of paint.
Now for the fun part: painting a diamond pattern on the top. First I placed a yard stick from corner to corner.
Using a pencil I marked off the line. Then I repeated the process for the other two corners creating an "X".
I used a piece of trim molding that I had on had as a guide for my pattern. I lined the board up with my first line and continued to trace the pattern. I repeated this step for the opposite angle until the top was filled with the diamond shapes penciled in.
I roughly painted in the diamonds with Duck Egg blue and Old White. Then I sanded back the painted pattern.
I added some more hints of Duck Egg and Old Ochre to the spindles to help with color balance. Then I sealed it with clear wax. I added touches of dark wax here and there.
After:
 |
| Vintage tea cart painted in Coco, Duck Egg Blue, and Old Ochre. |
 |
| Painted vintage tea cart. |
The back end has a handle for pushing the cart. It can be slid underneath when not in use.
 |
| Coco, Duck Egg Blue and Old Ochre. |
 |
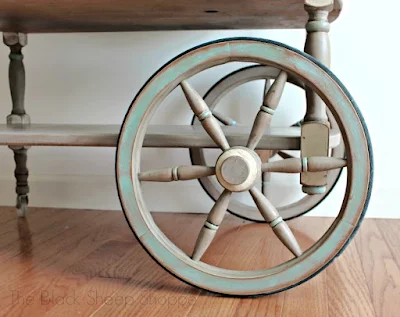
| Painted tea cart wheel. |
 |
| Small drawer on front of vintage tea cart. |
 |
| I continued the accents of Duck Egg Blue and Old Ochre onto the wheels. |
 |
| Tea cart with sides extended. |
Here's a closer look at the hand-painted diamond pattern. Perfectly imperfect.
 |
| Perfectly imperfect hand-painted diamonds. |
 |
| Vintage tea cup collection. |
 |
| Vintage tea cups on tea cart. |
I hope you enjoyed my project. A supply list is below for your convenience.
Supply List:
Below are the supplies I used for this project. Some links are affiliate links which means I earn a small commission if you make a purchase. It doesn't cost you extra, but it helps support the time and effort of maintaining the blog.- Chalk Paint by Annie Sloan
- Wax, clear & dark
- Vintage Effects paint brush
- Small flat brush (for diamonds & accents)
- Yard stick, pencil, & trim
- I didn't use a stencil, but next time I think I will make the investment to save time. Here's a diamond stencil that I found on Amazon that comes in different sizes.


Patricia, you do such beautiful work! Your vintage tea cart is gorgeous. Distressing the diamond pattern on the top adds so much charm to this piece and I love your application of color and dark wax. Pinned and sharing :)
ReplyDeleteThanks Marie! I appreciate your kind words. Thank you also for pinning!
DeleteThe tea cart is exactly the one I inherited from my mom. Have been wondering what to do with it. Now I have a pretty good idea what I want to do!
ReplyDeleteGood luck with your project Cheri! I hope it brings you lots of happy memories of your mom.
DeleteI have similar tea cart and have told my daughter not to ever paint it or I will haunt her! I love the look of wood.
DeleteHi, how did you add the duck egg paint to the wheels? Did you paint them then wipe it off to achieve that look? I’m trying to do something similar to the wheels on my cart with a similar Annie Sloan color. Thank you.
ReplyDeleteHello. Yes, I painted a couple of coats of paint and then sanded some of it away.
Delete