Welcome to my dark and dreary basement stairwell! Spoiler alert: It's not dark and dreary anymore! But first let me give you a quick tour of the "before".
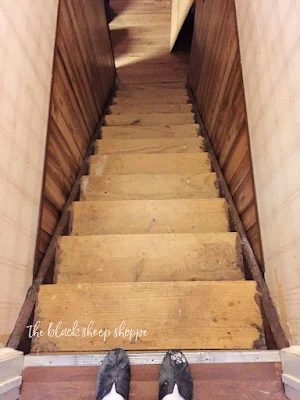
This is a photo of our basement stairwell from the first day we purchased our fixer-upper house in 2020. It obviously needs some work, but there are plenty of other projects throughout the house that will take priority.
 |
| Basement stairwell before renovation. |
Except the open electric box needs attention that can't be delayed!
 |
| The electric work wasn't done properly. |
The switch and wiring were not installed properly, so we had that professionally repaired immediately. Unfortunately we had to cut into the wallpaper and drywall. But at least now it's safe.
.jpg) |
| Electric switch and wires repaired and replaced. |
The ceiling light is a bare lightbulb.
 |
| Bare lightbulb in basement stairwell. |
The top portion of the stairwell is wallpaper from the 1970's. It's not a bad pattern, but it's very dirty. The bottom half is cheap brown paneling. The stairs are basic unfinished wood. I didn't take a before photo of the view looking up, but there were no risers on the steps.
 |
| Looking down the basement stairwell. |
We removed the brown paneling.
 |
| Brown paneling removed. |
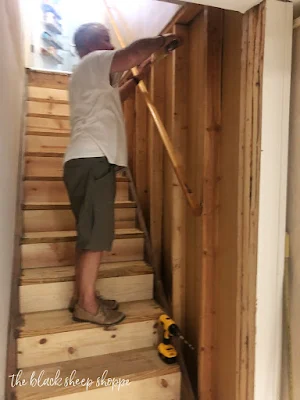
My husband added risers to the steps.
 |
| Risers added to basement stairs. |
Then he worked on adding drywall to replace the old brown paneling.
 |
| Preparing for drywall in stairwell. |
We can probably agree that it's still not much to look at. Yet here we are. And it stayed this way for four years! The main problem that stalled the project for us was the height of the stairwell. From the bottom of the stairs to the ceiling was 16 feet. Neither of us was eager to DIY the project while working on scaffolding. In the end we decided to hire the job out to professionals. So we worked on other DIY house projects until we saved enough money to hire a contractor.
 |
| Basement stairwell in need of renovation. |
PROJECT STAIRWELL UNDERWAY:
My design plan is to wrap the entire stairwell (walls and ceiling) with shiplap paneling. (The design was inspired by a photo on Pinterest, but there wasn't a link to the original photographer, so I don't know who to credit for the inspiration.) Our contractor first removed the old wallpaper. I'm not sure why this step was necessary, but it was done very quickly.
 |
| Tall ladder in stairwell. Wallpaper removed. |
Next they sprayed and lightly evened out the textured ceiling. Honestly it looks better already!
 |
| Wallpaper removed and ceiling scraped. |
Once the prep work was done, the team quickly started installing the paneling. The next day they caulked and painted the walls and ceiling. Finally they installed a new light fixture (more on that soon),
 |
| Scaffolding in stairwell for shiplap installation. |
It took our contractor and his team two days to finish the project. I let the fresh paint cure for a month and then started working on the stairs.
 |
| Preparing to paint the basement stairs. |
The plan is to eventually install new bullnose treads, but quite frankly I am pretty sure it won't happen anytime soon (or ever). So I decided to paint the stairs for now. First I applied a stain blocking primer. Next I filled in a million nail holes with wood filler. It was easier to see all the holes after the primer was applied. I sanded the wood filler smooth and then got busy painting.
 |
| Sanding woodfiller on basement stairs. |
THE BIG REVEAL:
And finally here is my newly renovated basement stairwell!
 |
| Basement stairwell wrapped in shiplap. |
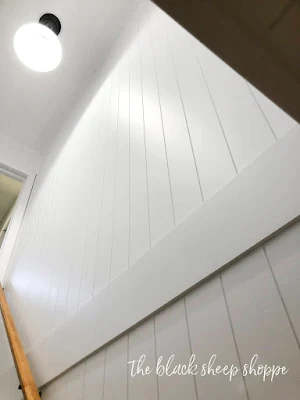
The new light fixture worked out beautifully. It's actually one that I bought 15 years ago for my son's bedroom at our previous home. I brought it with me when we moved and was happy to have found a use for it. I don't have a link to the exact fixture that I bought,
but this one is very similar.
 |
| Light fixture in basement stairwell. |
Of course we can't reach the light to change the bulb when it burns out, so we use a
light bulb changer to get the job done! This is the reason I chose the open
pendant style light. Otherwise, we would need a ladder to change the lightbulb.
 |
| New light fixture and shiplap in stairwell. |
I don't miss the old wallpaper, brown paneling, and pieced in drywall!
 |
| Vertical shiplap in stairwell. |
Let's take a look from the bottom of the stairwell.
 |
| Looking up from the bottom of the stairs. |
My design plan was to hang the shiplap panels vertically with a 12-inch trim board to hide the seams.
 |
| Vertical shiplap with 12 inch trim board. |
In addition to hiding the seams, the horizontal trim board helps break up the vertical lines.
 |
| The trim board breaks up the vertical lines. |
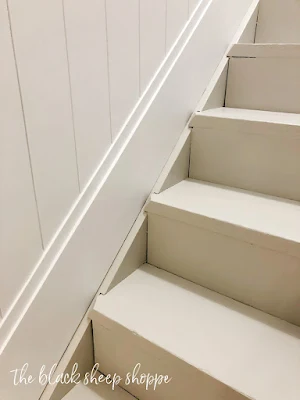
The bottom of the panels are also finished with a trim board above the skirt board. This helped fill in the gaps between the shiplap paneling and the stairs.
 |
| Trim board installed on top of the skirt board. |
My husband started caulking the stairs before he went out of town, but he didn't get a chance to finish. So I went ahead and applied two coats of paint on the stairs while he was away. Once he finishes the caulking I will put a final coat of paint on the stairs and seal the paint with a floor sealer. (I could do the caulking myself, but my husband is particular about it and frankly better at it than I am.)
Here is the link to the paint I used on the stairs. The color is putty. I purchased a quart and still have enough left to put the final third coat on. The paint has a top coat built in, but since it's on stairs I will still need to seal it further for added protection. I used a brush to cut in the corners and then filled in with a 4" roller. I painted every other step and let it dry for a couple of hours before finishing up the remaining steps.
 |
| Basement stairwell with shiplap and painted stairs. |
The stairwell looks so much better now!
 |
| Painted basement stairs. |
Here's a photo that I took standing on the stairs looking up towards the ceiling. It reminds me that I'm glad we didn't have to stand on the scaffolding ourselves. It was worth every penny to hire this project out.
 |
| Looking up the basement stairwell. |
And finally, one last look of the before and after.
.jpg) |
| Before and after basement stairwell. |
Now we feel inspired to tackle the remaining projects in the basement. I will share those with you as we get those completed. Thanks for stopping by The Black Sheep Shoppe today.


.jpg)


.jpg)

WOW!!!!!! You and Jeff have done a super job as usual!!!!!!!
ReplyDeleteThank you! We're both so glad this project is finally done.
DeleteHow did the paint on the stairs hold up? Are stairs slippery?
ReplyDeleteIt has been a year and the paint has held up perfectly. However, we don't typically wear outdoor shoes inside the house, so it's usually slippers or socks. I don't find the stairs slippery.
DeleteThat's amazing!! So happy I saw this!! Thank you for posting!!
ReplyDelete