Faded Grandeur Finish on Vintage Dresser
The dresser was made in the early 1900's and was manufactured by the Sligh Furniture Company in Michigan. The label on the back indicated it was sold by the department store Pouge's in Cincinnati, Ohio.
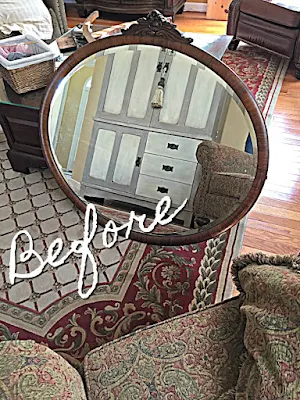
It also includes a coordinating mirror with beautiful detail trim work. The set is very large, so I kept it disassembled as I worked on the project.
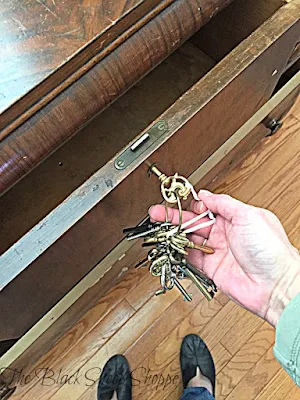
One major problem is the center drawer was missing the key, and since there wasn't a knob, a key was essential. I bought it with the hopes that one of my skeleton keys would fit, and luckily for me I had one that fit. If you hunt thrift stores for furniture then a set of skeleton keys will come in very handy. (Links to products are provided for your convenience. These are products that I have actually purchased and used. Don't worry it won't cost you extra.)
It gets a bit crazy while I am working on projects, so I tucked the key safely away while I worked. In the interim I made a temporary drawer pull with painters tape.
The temporary drawer pull worked like a charm.
The second major problem with the dresser was the severely damaged veneer on the drawer fronts. A few missing pieces here and there can be patched in fairly easily.
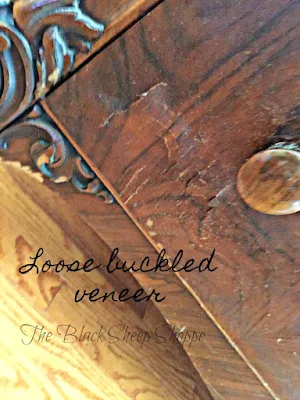
But the wood veneer on the bottom drawer especially had a lot of damage across the entire drawer front.
If you look closely you can see that the wood is loose and buckling.
The damage was too severe to repair, so I decided to remove the loose sections.
I patched the areas missing veneer with wood filler. After it was dry I sanded it smooth with my orbit sander. I used a professional strength wood filler for this project.
I wanted an even finish beneath my painted surface, so I applied a gel stain over the wood filler.
As usually happens with wood filler, it required a second coat. But I sort of liked the grungy look and instead decided to work it into my design.
For the painting process I set up two work stations. I used my kitchen island to paint the mirror frame. Taping off the mirror isn't strictly necessary, but I find it worthwhile to take a few minutes beforehand and tape it -- less clean up in the end.
I created a second temporary painting studio in my living room. I had to temporarily re-route pedestrian traffic, but everyone was a good sport about it.
My base color is French Linen and the main color is Duck Egg Blue. The base color isn't prominent, but it does make a difference in the end which you will see in one of the "after" photos.
I don't have the steadiest of hand when it comes to painting, so I used a small angled artist brush to paint the Duck Egg around the detailed trim work. The angled brush makes all the difference.
AFTER:
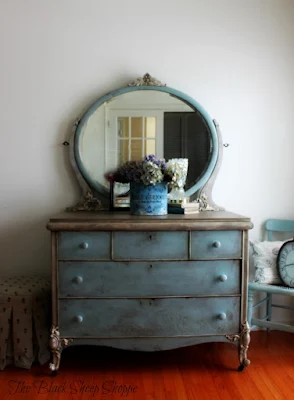
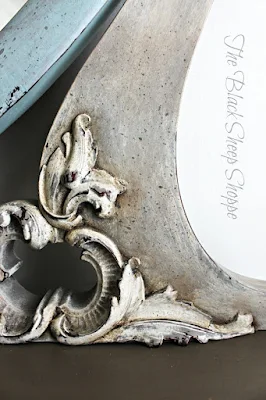
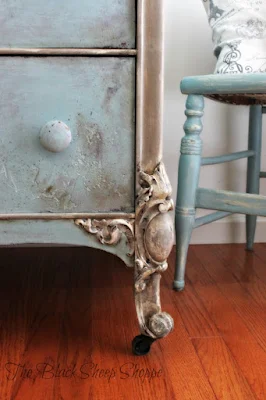
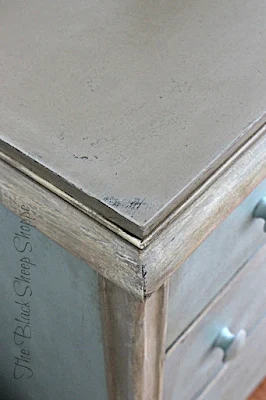
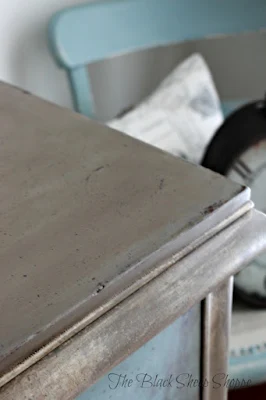
And here she is with her new Faded Grandeur painted finish. The staging props I used were chosen strictly for me to hide behind while I took the photos.The main color is Duck Egg with Coco and Old White for the trim.
For the frame holding the mirror I used Coco and Old White with a touch of dark wax.
The dresser in the foreground is Duck Egg Blue over a base coat of French Linen. The chair in the background is also Duck Egg Blue, but the base coat is Old Ochre. Can you see the difference the base coat makes?













I am a wood lover that hopes that the beauty of the wood will be repaired and loved and not just covered up in Coat of Paint. But i have to say that you have brought out the beauty in this piece--well done. well done. you should be proud
ReplyDeleteThank you! Your comment means a lot to me. I appreciate your feedback.
DeleteI agree, but sometimes the "wood beauty" is beyond salvaging. This is a prime example of that. Remember, there are fine furniture pieces, that are painted. IMO the value of this piece has been increased.
DeleteThank you :)
DeleteI have an almost identical dresser like this, I turned it into a bathroom vanity. Was able to keep the wood color, the veneer damage , is on the wall side, (unseen).
DeleteGreat job!
I've been wanting to turn a dresser into a bathroom vanity, but don't have the space yet. Lucky you!
DeleteThis is just GORGEOUS...I am really thinking about taking courses on how to do this...hopefully if I do I could be as good as you!
ReplyDeleteThanks so much. I think you will enjoy painting and hope you give it a try!
DeleteI usually keep my opinion(s) to myself, as most of the time the opinions other people care to share are just hurtful and mean... but I absolutely feel obligated to tell you that this is the MOST BEAUTIFUL restoration project that I have EVER seen in all of my years on this Earth! (and I am no spring chicken! LOL) You are a true artist! (I wish you lived close to me, as I have a few pieces that I would LOVE for you to paint for me.) Nevertheless, I just wanted to say to you that you are using the talent that God gave to you very well!! Bravo!
ReplyDeleteThank you so much for your kind words. Your comment made my day. :)
DeleteAbsolutely beautiful!! You really do have a great talent for painting furniture!!
ReplyDeleteHi, I love what you did, I do have a question, aside from fixing/patching the veneer did you have to sand it down? This is a bigger question.....how do you decided what color(s) to choose, I'm imagining this piece in other colors and I'm just not in visioning them working as well as what you chose. Unless it's having an artists eye!
ReplyDeleteI used an orbit sander to sand down the wood filler, but otherwise didn't do any sanding to the rest of the piece. The paint was wet distressed with a damp cloth. For determining a color palette you could search on Pinterest for inspiration. Or look at artwork/paintings that you love and choose your palette from that. If you let me know what main color you are leaning towards I might be able to offer some suggestions. In the meantime, have fun and enjoy your project!
DeleteI love this! Inspiration abounds...thank you!
ReplyDeleteThanks so much!
DeleteI also refurbish old "unsalvageable" furniture. This. Is. Gorgeous! I'm still working on getting close to how good you are! Thanks for sharing.
ReplyDeleteThank you for your kind words. I cringe sometimes when I look at my older projects, but I love them all the same. Just keep at it and enjoy what you do!
DeleteWonderful. You added to the beauty and value of this piece.
ReplyDeleteThanks so much!
DeleteThis is absolutely beautiful. What a way to save a grande dame. My obsession is round mirrors, I just love this color and artistry.
ReplyDeleteThank you Helen! I love the round mirrors, too. Especially when they have pretty trim.
Deletei agree with all that has been said. i love restoring wood if possible. but dear lady, you've taken what appeared to be an impossible piece to save and turned it into a work of art. leaving the wood filler rough was brilliant. my goodness, you are talented.
ReplyDeleteThank you so much Smooches. I appreciate your comment about leaving the wood filler rough. It was a tough call at the time, but in the end I think it worked.
DeleteAmazing!! I didn't think you could pull this off. I though you may have taken on more than you thought. That's taking restoration to a whole new level. Outstanding Job. I love it.
ReplyDeleteOhMyGosh, I am in love with this finish! I have a very similar dresser sitting in my living rooms right now (for lack of somewhere else to put it) and it already has two coats of French linen paint on the drawers. I want to try this but I think the French linen may be on too heavy for the original wood to show through unless that look is actually the wax. I'll look at the paint class you mention because I HAVE to know how this is done. Beautiful work!
ReplyDeleteThank you so much Diana. Most of the color variation is from wet distressing the Duck Egg over the French Linen. Dark wax is only in the crevices and corners. You could sand or wet distress the French Linen before applying Duck Egg and then wet distress again. Either way I'm sure it will be beautiful. If you try Jonathan's classes you won't be disappointed. He has a way of teaching and demonstrating that just makes it all come together.
DeleteI completely agree with all of the commenters. This piece is an absolute beauty! I love how you took the 'defects' and turned them into accents. Amazing job!!!
ReplyDeleteThanks so much Tina!
DeleteThis is absolutly stunning. You are very gifted and talented. Love it! Blossom Adelaude Soth Aust
DeleteThank you!
DeleteFist off, I absolutely love this. All the different tones makes these two pieces stand out from time with more beauty as if they just came from the royal family’s home. I do want to make sure of one thing about the technique though. After painting the Duck Egg Blue, Coco, and Old White over their base coats, did you then rub the extra paint off? I saw that you brushed a nice coat on so I wasn’t sure if you lightly sanded or rubbed with a cloth. Also, how long did you allow the paint to sit, did you seal these after, and what kind of paint were you using? Unless I looked over it, I don’t remember seeing if it was clarified. I know it’s a lot of questions, sorry. I have a set I worked on for my living room, but this would be gorgeous in my kids room. Well the color would change slightly but it’s still perfect!
ReplyDeleteThank you. I appreciate your kind comment. I wet distressed the paint with a cloth and sealed the entire piece with soft clear wax.
DeleteWhat really adds to this piece is your choices to paint what and where! Those little touches of painting the separator pieces adds so much! Also the carved details in the off white. If you had painted it all the same this piece would NOT have the panache it now has! Duck egg blue was a great choice. Well done. It looks like you speckled the finish as well. You don't speak to that but I see it on the piece. A toothbrush? I use that when I do it. What color did you speckle w? Looks to be a dark gray, also chalk paint? Paris Grey or is that too blue?
ReplyDeleteThank you so much for your kind and thoughtful comment! And yes I did speckle a bit here and there. But I couldn't do as much as I would have liked because I was working in my living room and didn't want my walls speckled, ha ha. I used the bristles of a stencil brush. The speckled paint color is a mixture of French Linen and Graphite, about 50/50.
DeleteThis is amazing and I love, love, love the color! My question is - Does 'distressed with a damp cloth' (you mentioned in one of the comments) make the small dark spots?
ReplyDeleteThank you so much Tracy! The distressing of the paint actually removes some of the paint back to the original finish or the base coat and gives it the look of a faded and worn over time finish. The little spots I applied after distressing using a chip brush and flicked the paint randomly onto the dresser. I'm not sure if I explained that properly, but hopefully that helps!
DeleteBeautiful work and technique. I too am a lover of wood and like to keep it on the side of unpainted to be able to enjoy different woods’ grain. This piece in the shape you got it would have cost a great deal to have someone professionally re-veneer it. IMO you created a piece that elegantly stands out even from when it was in very good shape.
ReplyDeleteThank you so much for your feedback.
DeleteJust one thing. Absolutely breathtaking~
ReplyDeleteHi!
ReplyDeleteJust gorgeous! Thought for sure paint would completely destroy it's beauty and details of fine workmanship, but you really created a masterpiece! Congrats on your artistic vision and talent!!!
Thank you so much for your kind words.
DeleteWOW!!! This is an amazing transformation! I love it! I think this is my favorite dresser I've ever seen redone. You did a fabulous job! Thank you for sharing all of the information and your tips and I hope you enjoy it for a lifetime.
ReplyDeleteThanks so much Lorraine! It was one of my favorite projects. :)
Delete😍❣️
DeleteSince all of the good folks previously have stolen every word I had planned to use, I almost didn't comment. However, if you knew me, you would thoroughly appreciate the following statement which I do not make lightly: This is the ONLY wood piece - no matter what shape originally - which I can unhesitatingly state has been truly made better by the use of paint. Kudos and keep up the good and gorgeous work!
ReplyDeleteThank you so much for your comment. There were a couple of times during the project that I thought I was in over my head, but in the end it worked out OK.
DeleteAbsolutely beautiful.. I may have wondered for a brief moment why you’d paint this piece ... but no more. You didn’t just save or repurpose it, you gave it new life & improved the look more than I’d have ever thought possible. It’s ten times what it was originally. Bravo! ����
ReplyDeleteThanks so much Nic!
DeleteAbsolutely beautiful.. I may have wondered for a brief moment why you’d paint this piece ... but no more. You didn’t just save or repurpose it, you gave it new life & improved the look more than I’d have ever thought possible. It’s ten times what it was originally. Bravo! ����
ReplyDeleteGreat job!! I love it, I like to paint furniture too!
ReplyDeleteI apologize for the delay in my response Cheryl. I am afraid your comment got lost in the shuffle. But I appreciate your kind comment. Keep on painting! :-)
DeleteVery nice!! Is the top just painted, too?
ReplyDeleteThank you Leah! The top was painted with Coco chalk paint.
DeleteGorgeous work! I see I’m late to the show but I have some questions if you don’t mind.
ReplyDeleteDid you use any kind of primer to prevent bleed through? Did you mix the old white with the cocoa or use them separately?
I did not use primer on this piece. After the first coat of paint I checked carefully for any bleed through and luckily there was none. However, if there was bleed through I would have used a coat or two of clear shellac before proceeding with painting. I layered the old white and coco paints separately.
Delete