The young employees at the thrift store were loading this cedar chest into my vehicle, and I overheard them say, "Who would buy this ugly thing?" They were embarrassed when they realized I was standing right there, but I just laughed and told them, "No problem, I will make it pretty."
 |
| Before vintage cedar chest. |
From a distance it doesn't look too bad, but up close it looks a little worse for wear.
 |
| Worn finish on cedar chest. |
The interior needed some minor repairs, but otherwise it was in decent shape.
 |
| Interior of cedar chest with shelf. |
After cleaning the chest inside and out, I filled in a few major dings with wood filler. Then I glued and clamped the broken shelf (seen in the foreground of the photo below).
 |
| Shelf inside of cedar chest lid. |
The green fabric lining in the vintage pieces I find never look too clean. Luckily I had enough leftover fabric to cover the width of the shelf.
 |
| Replacing shelf liner with fabric. |
I started painting with a base coat of Paris Grey.
 |
| The base coat is Paris Grey. |
I layered and blended the Paris Grey with Duck Egg Blue. I was focused on enjoying the painting process that I didn't take any more "during" photos, but hopefully you can see the effect of the color variations in the photos below.
AFTER:
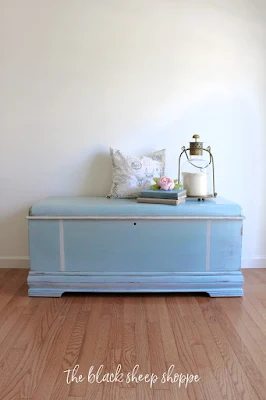
The layered and blended paint effect is subtle.
 |
| Painted vintage cedar chest. |
To break up the color and add a little more interest to this otherwise plain finish, I painted the trim piece on the top in Paris Grey and Old Ochre. Since there wasn't any decorative detail to the front of this piece, I painted two stripes on the front of the cedar chest to add a little more interest.
 |
| Trim piece painted to contrast. |
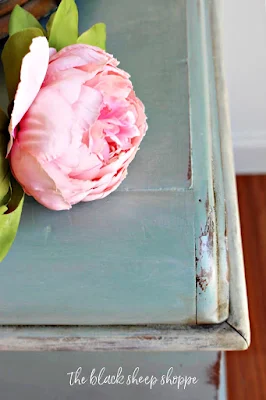
I applied light to medium distressing here and there, but mostly where the finish was naturally worn over time. Depending on the light the paint will lean more towards either blue or green. Overall it looks mostly blue to me.
 |
| Painted distressed finish. |
 |
| Color variation in blended paint finish. |
The stripe is Old Ochre softened with a light touch of Paris Grey.
 |
| Hand painted stripe on cedar chest. |
The interior shelf provides even extra storage to the cedar chest.
 |
| Interior shelf on lid of cedar chest. |
The former green shelf liner was replaced with a beautiful fabric.
 |
| Shelf lined with fabric. |
The underside of the top is stamped with the manufacture's label: Roos Chests, Forest Park, Illinois.
 |
| Manufacturer's stamp on cedar chest. |
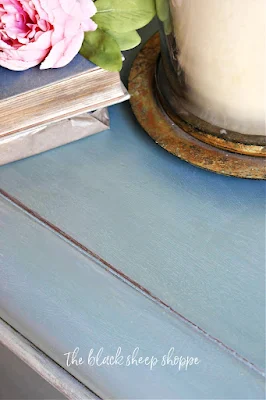
I'll finish with a couple of close up photos.
 |
| Painted blue finish. |
 |
| Hand painted vintage cedar chest. |
Thank you so much for stopping by The Black Sheep Shoppe today!


Do you mind me asking where you got that cedar chest?
ReplyDeleteNo problem. I bought the cedar chest at a local Cincinnati Goodwill store.
DeleteDid this have a laminate type veneer you peeled off? I have one that's similar I'm looking to refinish but it feels like a laminate stuck to wood.
ReplyDeleteHi Kait, No this one was solid wood. However, I have painted many laminated finishes with chalk paint with good success. Below are a few links for examples:
Deletehttps://theblacksheepshoppe.blogspot.com/2019/11/blog-post-313-from-hot-mess-to-elegant.html
https://theblacksheepshoppe.blogspot.com/2018/02/vintage-sears-bonnet-dresser.html
https://theblacksheepshoppe.blogspot.com/2017/05/french-country-table-and-chairs.html
Thanks for all the links! I have a bedroom set from my mom that is laminate but very 70's. Someday I would like to redo it as well so I'll use my chest as a starting point. I appreciate you showing me your other examples!!
DeleteYou're welcome and good luck with your project!
DeleteKAIT, we have a bench we just got and it looks exactly like this one, we did peel off the veneer because it was old and was starting to come off it anyway. Just used a scraper and it came off pretty easily. Solid underneath and just did a simple light sanding
ReplyDeleteSo glad I saw this. I’ve got the exact same chest from my mother who purchased it in the 1940’s. Same Roos Heart Chest with the original labels still attached. Unfortunately it’s in worse shape than how you found this one. The wood veneer has lifted and come off in areas. Still has the key that works. I understand the company the lock/key long ago because it was a hazard for children. Would love to sell this piece as it’s just sitting in my garage. The inside is still secure and I’ve used it for all kinds of things I’ve stored and the cedar is excellent! Truly enjoyed seeing this and your makeover! Gorgeous!
ReplyDeleteThank you Beemer06. I love the extra storage these chests provide. You might be able to glue the wood veneer.
DeleteLooks great! I recently did a curbside rescue of a Lane version of this chest that looks almost identical style wise! Only yours is in much better shape. I couldn't leave her on the curb for garbage so I am practicing and learning how to make her pretty. I peeled off the really bad parts of laminate and filled with wood filler. I glued some other pieces down, attached trim with a brad nailer, and also had to glue the tray together. My question is for the fabric in the tray. I want to do the same! Did you just use fabric glue to secure it? I actually was hoping to use scrap silk from saris I've seen online for purchase as I have a very bold, colorful plan for mine. Thank you and great job on yours!! I love love the style and shape of this treasure!
ReplyDeleteIt sounds like you have a fantastic project on your hands! I used ModPodge to secure my fabric on this project. You can see the process in more detail on another project that I wrote about at this link https://theblacksheepshoppe.blogspot.com/2019/02/create-storage-space-from-old-furniture.html. I recommend you test the glue and fabric on a test board to make sure it works well on the silk. On thin fabrics the glue can sometimes show through or look blotchy. Best of luck with your cedar chest! I would love to hear how it turns out.
DeleteHow were you able to get the green lining of the inside shelf? That is where I'm stuck. Or did you just glue the material over the top of it?
ReplyDeleteFirst I vacuumed the green lining really well. Next I glued the new fabric directly over it. Good luck with your project!
DeleteI would buy that ugly thing, for even as is, I do not find it ugly. It's a wooden piece of vintage furniture, cedar at that! Why must youth be wasted on the young?
ReplyDeleteI agree Cristin! I love the vintage furniture, too!
DeleteYou destroyed it! Why would you do that? It was gorgeous and just needed to be restored!
ReplyDeleteThat's a great question. I have found in my market that I cannot give away restored furniture, but painted furniture sells like hot cakes.
DeleteJust starting to refinish my mothers Land cedar chest that is very similar to this. It was a HS graduation gift in 1946.
ReplyDeleteThere is a bottom drawer that's in pieces. I've figured out the box, but the bottom of the drawer is cedar veneer and is coming up/curling up in the strips. The base of the draw also is warpped. Any ideas on how to get the bottom of the draw to lay flat and get the veneer glued back down?
It sounds like you have a treasure! It is difficult to determine a solution without seeing the piece itself, but it sounds like the base of the drawer needs to be replaced and then new cedar veneer attached. Good luck!
DeleteI just saw this posting. I have, I think, the exact same chest. Thrift store find about 15 yrs ago. You didn’t mention that you sanded it or not. Since you are more experienced than me, do you think the bottom molding can come off and you can add feet? Thanks for your expertise.
ReplyDeleteI did not sand this piece, but it is always an option since it is solid wood. I don't remember the bottom specifically on this piece, but usually the molding can be removed. Just look for the joins and pry it off. Or use a saw if you have skills with power tools. If you're adding feet make sure that they are sturdy enough to carry the load of the chest, its contents, and potentially someone sitting on it. Best of luck with your project!
DeleteI have the same one from my great grandmother and I’ve held on to it my whole life. I couldn’t bare to refinish it as it has too many memories of sitting with my grandma talking about being a Wife and Mother one day. But I sure did LOVE seeing you turn it into something special and beautiful. Maybe one day I’ll be ready.
ReplyDeleteThank you for your kind words! When the worn finish has a special meaning it's not necessary to refinish it to make it look brand new. It sounds like your cedar chest is a treasure full of beautiful memories.
Delete