Antique Rocking Chair: Seat replacement and Painted Finish
Before:
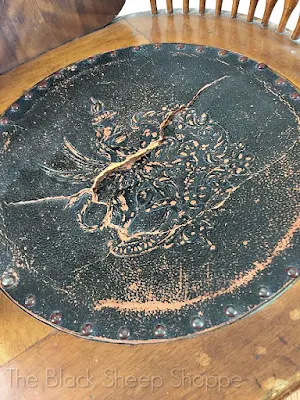
The chair itself is petite in size, but the seat is nice and wide making it perfect for rocking a baby, or to snuggle up with a pillow, blanket, and a good book.The main problem with the chair was the broken seat.
A previous owner replaced the cross support bar. It didn't exactly stick out like a sore thumb as it's underneath the chair, but it didn't match the rest of the chair.
Seat Repair:
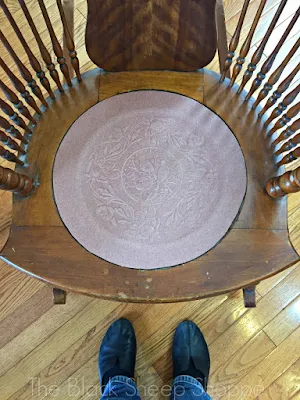
The broken seat repair wasn't as easy. To be fair, it wasn't too difficult, but it was time consuming. I had two chairs that needed new seats, so I ordered fiberboard seats for the replacements. They are available in different sizes, so I made sure that I ordered ones that were large enough to fit the seat openings.The first step was to remove the old seat. I used needle-nose pliers to grasp the upholstery tacks and tugged them out. Most came out easily, but others put up a fight.
Eventually all the old upholstery tacks were removed.
I used the old seat board as a template and traced the shape onto the new seat board. In hindsight I should have measured and traced my own circle as the original seat wasn't a perfect circle.
The seat board has to be sturdy enough to hold the weight of someone sitting in the chair, but pliable enough to cut. I initially tried using metal clippers which cut through easily, but they were harder to control a precise circular cut through the thick board. So I switched to my kitchen scissors. These allowed more control but were harder to cut through the thick material.
I just took my time and eventually got the job done. If you look closely you'll notice a few gaps, but hopefully the upholstery tacks will hide that.
The seat board can be either stained or painted. Now that I had my seat cut to fit, I went ahead and painted both the chair and the new seat board. Next it was time to attach the new seat. I drew a border line with a pencil as a guide and then marked off where the tacks would go with a small "x".
The big lesson I learned from the first project I did with a fiberboard seat is to pre-drill the holes (you can see that post HERE). Otherwise you end up with a bunch of broken and bent tacks. You don't need to drill much. In fact don't drill all the way into the wood beneath the seat. At a minimum, just drill enough to get a hole started to accept the upholstery tack.
Next I used an upholstery hammer to tap the tacks into the pre-drilled holes.
I was going to paint the tacks grey to contrast with the seat. But decided at the last minute to paint them white to coordinate with the other trim work.
After:
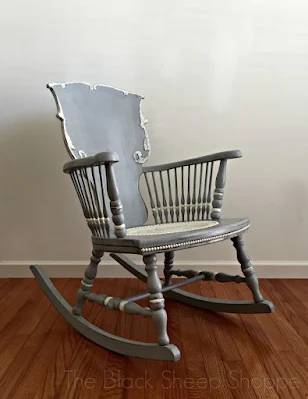
And here's the finished chair painted in Paris Grey with accents of Old White.
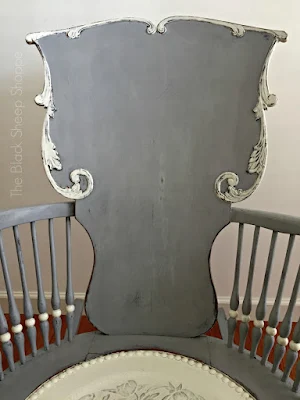
The trim on the seat back now contrasts against the main color.
I think the trim is especially lovely and is the star of the show!
I added some distressing to the painted trim.
Before the beaded trim on the front of the seat was barely noticeable. But now that it's painted in white it pops against the grey.
Here's a closer view of the beaded trim and the distressed paint.
My original plan was to paint the spindles white for contrast. Instead I painted them grey with a touch of white on the rounded beads to coordinate with the beaded trim and upholstery tacks.
It would have been so much easier to paint the entire body of the spindles white. Let's just say it wasn't easy getting the white painted -- tight spaces and awkward angles, but once the idea grabbed me I couldn't let it go.
Here's a closer look at the spindles from inside the chair.
Here's a closer look at the new seat. The pattern I choose was a pair of birds with a nest of eggs. I painted the seat white and dry brushed the raised design with Paris Grey.
Supply List: (affiliates included)
Wood filler
Needle-nose pliers
Fiberboard replacement seat
Upholstery tacks
Upholstery hammer
Paris Grey
Old White
Flexible sanding pads
Soft Clear Wax


Beautifully finished! Can you tell me why they used fiber board in the center of older chair seats? Almost every one I've seen on old furniture was damaged. As opposed to those with a solid wood seat. Thanks!
ReplyDeleteThank you Bev. Many chair seats were finished with leather or caning. Once the material wore out or broke it was often replaced with the fiber board. Probably as a less expensive option. I agree that a wood seat would last longer.
DeleteDid the raised pattern on the seat come with the fiberboard or did you make that somehow?
ReplyDeleteThe replacement seat included the raised pattern. I purchased it online from Kennedy Hardware. They carry a variety of sizes and patterns.
DeletePainting over a solid oak chair makes me sad. My choice would have been to refinished and leave natural wood.
ReplyDeleteIf painting a chair would make you sad then you should definitely refurbish it instead. Do what makes you happy.
DeleteYou did an incredible job and I would love to own this chair!
DeleteBeautiful!!!!
ReplyDeleteThanks so much Jackie!
Delete