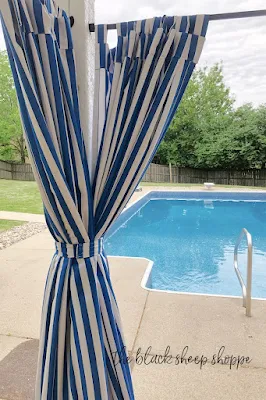
I took the plunge and made outdoor curtains for our pool cabana. This was my first time ever making curtains. After making
a slipcover for my sofa bed, I felt confident that curtains would be an easier project, and I was right!
Overall the covered portion of the deck works great. Except in the late afternoon when the sun shines directly onto the deck. There's very little shade at this point, so I wanted curtains to block the sun as needed. For our previous gazebo I puchased outdoor curtains, but the fabric never lasted more than one season. Plus I needed a customized size, so making my own was my best option.
 |
| Curtains will provide relief from the hot summer sun. |
I followed a
free step-by-step tutorial that I found at the Online Fabric Store (no affiliation). I liked that they included a detailed written tutorial as well as a video. They also carry affordable fabric selections.
My first step was to determine my finished measurements, plan my fabric layout, and calculate the yardage. Normally I sketch this out on paper, but this time I created a grid in Excel. I've included a screenshot of a sample section of what I used:
 |
| Sample of planning grid for outdoor curtains. |
Cutting the panels was a little tricky because I don't have a table big enough to spread out the fabric, so I used the floor instead. I roughly measured the length of my cut and put painters tape on the floor as a guide. Then I unrolled the fabric and folded it in half lengthwise. I smoothed out the fabric and placed some weights at the top to hold it in place.
 |
| Roll out fabric on a flat surface. |
I measured the fabric again and then used
tailor's chalk to mark my cut line (the line is faint in the photo, so I added a red line to emphasize the cut line for you).
 |
| Measure twice then mark the cut line with tailor's chalk. |
I slid my
cutting mat under the fabric before making the cut with my
rotary blade. I repeated the process for each of my panels.
 |
| Using a rotary cutter and mat. |
The two panels on the side of the cabana needed to be a little wider than the width of my fabric. Consequently, I needed to join extra fabric to the width. I did some research and decided to sew a flat felled seam as this would be sturdiest option.
 |
| Flat felled seam on the wrong side. |
The flat felled seam on the right side is neat and tidy and not noticeable overall.
 |
| Flat felled seam on the right side. |
The project was basically sewing rectangles. Large rectangles for the panels, medium rectangles for the facing piece, and small rectangles for the tabs.
 |
| Sewing tabs for curtains. |
There were 36 tabs in total and this was the most tedious part of the project.
 |
| Turning fabric inside out. |
Eventually I completed sewing the tabs, and then ironed them flat.
 |
| Ironing curtain tabs. |
I spaced the tabs 5" apart and pinned them to the panels prior to sewing. I continued following the tutorial by joining the front piece and finishing the bottom hem for each of my four panels.
 |
| Stainless steel mounting brackets. |
 |
| Metal curtain rod resting in mounting bracket. |
I slid the tabs onto the pipe and this project is complete!
 |
| Sliding curtain onto a metal pipe. |
Here are the curtains closed on both sides.
 |
| Custom curtains on pool cabana. |
The view from the inside shows how much it will block the sun.
 |
| Custom outdoor curtains. |
Once opened it still allows easy access to the pool. The tabs slide easily over the pipe.
 |
| View of the pool from the cabana. |
A view from the side onto the sun deck.
 |
| Sun deck next to the cabana. |
To finish the project I made a tie-back. It's a larger version of the tabs that I made for the curtains along with some hook and loop tape.
 |
| Curtain tie-backs with velcro. |
The curtains are easily secured out of the way when not in use.
 |
| Outdoor curtains secured with tie back when not in use. |


Comments
Post a Comment
Select the NOTIFY ME box to receive a notification of a reply to your comment (yes, I do try to acknowledge all comments). There might be a publishing delay on older posts as they are moderated to reduce spam.