How to Get a Professional Finish with Chalk Paint
Learn how to transform out-dated furniture! In today's post I will provide the basic step-by-step instructions of how to create a professional finish with Chalk Paint. Not every project requires all steps, for instance, I don't always sand or distress the paint, but for most projects I do. Follow the basic steps and be creative with your project and you will be a pro in no time!
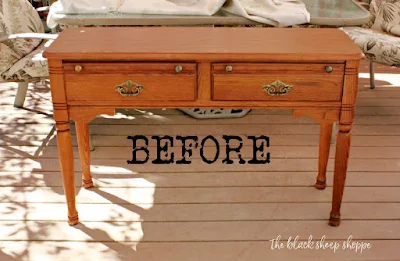
The project I am working on today is an oak table. I plan to update it with a classic black finish using Graphite chalk paint.
 |
| Oak table before painting. |
Steps to Get a Professional Finish
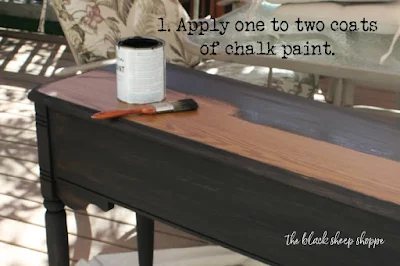
After cleaning and making any necessary repairs, follow the steps below to get a professional finish:STEP 1: APPLY 1-2 COATS OF CHALK PAINT
Applying the paint is my favorite part of any project! It's so fun to watch the project transform just by using paint. What I especially love about Chalk Paint is that it doesn't require a primer coat.Some colors with less pigments, such as whites or reds, might require 3 or more coats to get complete coverage. One coat of paint might be appropriate for a primitive or heavily distressed finish.
 |
| Apply one to two coats of chalk paint. |
STEP 2: Initial sanding.
This step creates a lot of sanding dust, so be sure to take your project outdoors and put on a sanding mask! If you're working indoors then I strongly suggest using a WET SANDING method instead (see my article How to Sand Chalk Paint Indoors).
Flexible sanding pads are especially useful on rounded edges, furniture legs, and spindles as it will conform to the curves and gives you more control. I cut the pads in half with scissors and they fit my hand perfectly. The pads are reusable -- simply rinse with water and let dry.
 |
| Lighty sand the paint smooth. |
STEP 3: Use 220-grit sandpaper to wear back the finish and apply distressing.
After sanding back the paint with a sanding pad, I next use 220-grit sandpaper to continue smoothing the paint and to apply a distressed finish. For heavier distressing, first apply more pressure as you sand the paint. Increase the pressure gradually until you get the look you're after. I wrap my sandpaper around my sanding pad for added control and to avoid over-sanding. |
| Use 220 grit to smooth and distress the paint. |
Steps 4, 5, and 6 are all about clearing up the sanding dust!
It looks like a lot of work but it actually goes very quickly.
STEP 4: Use a soft brush to gently brush off excess sanding dust.
There will be lots of sanding dust to deal with, so I use a large soft bristle paint brush to gently brush off the excess, trying to avoid creating a giant dust cloud. I use the brush to sweep the dust into a pile and then use a plastic grocery bag as a dust bin.
 |
| Use a soft brush to clear away the sanding dust. |
STEP 5: Rub a tack cloth over the furniture to remove remaining sanding dust.
Basically a tack cloth is sticky cheese cloth. I'm not a huge fan of the stick feel, but it's very effective at removing the excess dust, so it is a worthwhile step.
The tack cloths come folded, so simply wipe the furniture with the cloth. When the area of the cloth becomes full of dust, refold the cloth and continue wiping.
 |
| Using a tack cloth to remove dust. |
STEP 6: Use a damp shop towel to remove any remaining residue.
At this point most of the sanding dust is removed; however, I like to give it a final wipe down prior to waxing.For this step I use a damp shop towel which is basically a heavy duty paper towel, but it doesn't fall apart easily when wet and it's lint-free. As the towel picks up residual sanding dust, I re-wet it, wring it out, and continue wiping the furniture.
 |
| Wipe with a damp shop towel. |
STEP 7: Apply a coat of soft clear wax.
The final step is to seal the paint with soft clear wax. The trick to applying wax is to not use too much wax. Test it out by using a small amount of wax and add more as needed to spread it evenly over the project. You don't need to use a lot of pressure when spreading the wax, just spread it around and lightly work it into the paint.
I use a waxing brush, but you could also use a lint free cloth to apply the wax. However, I've found the waxing brush is faster and uses less wax.
Working in small sections, use just enough wax to spread evenly over the surface. The color of the paint may deepen slightly as the paint absorbs the wax. Any wax not absorbed is excess wax. Use a lint free cloth to wipe off the excess. It is "dry" to the touch almost immediately; however, it can take a few weeks to fully cure and harden.
Once the wax is cured it will provide a durable finish. Although not necessary, additional coats of wax can be applied for extra durability, but wait at least 24 hours or more between coats. Alternatively you can seal the paint with polycrylic, but make sure the brand you use is compatible with the paint you're using!
 |
| Seal chalk paint with clear wax. |
After:
I apologize for the poor photo quality of the "after" shots, but my camera is not working properly, so these are the best photos I could get at this point in time. Nevertheless I think you will see the overall beauty of the painted finish. |
| Painted oak table. |
For this project I used two coats of Graphite (Annie Sloan Chalk Paint). I followed the steps listed above and finish with a coat of soft clear wax.
 |
| Oak table painted with Graphite. |
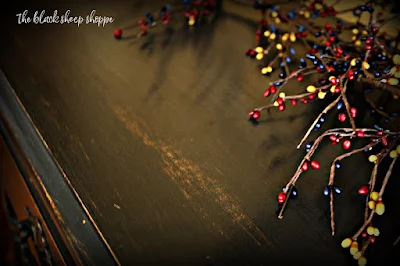
A closer look at the table top below shows how using sand paper can achieve a worn finish.
 |
| Distressed finish using sand paper. |
Gentle distressing of the paint was created with a flexible sanding pad.
 |
| Painted finish gently distressed. |
 |
| Distressed chalk paint finish. |
I painted the knobs in the same color so they would blend into the background.
 |
| Painted drawer knobs. |
I lightly distressed the drawer pulls to give them a bit of dimension.
 |
| Painted drawer pulls. |
Finally, this photo shows the soft sheen created by the wax over the smooth painted finish.


Fabulous, fabulous, and fabulous. Thank you!
ReplyDeleteThank you Ivory!
DeleteLooks great! Love the original casters - it gives the piece character.
ReplyDeleteThank you Debra!
DeleteYour projects are gorgeous. I'm going to try my hand at some refinishing/painting furniture in the very near future. My question is... instead of wax as a top coat can you use another clear coat product like varathane or similar product over chalk paint. My thinking is what if I want to paint it again? How hard would it be to remove the wax and is it as durable as varathane?
ReplyDeleteThank you Kerri. The wax was developed to work specifically with Annie Sloan Chalk Paint (ASCP) and will give it a beautiful finish. If you ever want to repaint it you can paint directly over it with ASCP. But if you prefer something other than wax then I recommend General Finishes High Performance Top Coat. It comes in either a flat or satin sheen. Once it's dry you can lightly sand it with a super fine grit sand paper for a smooth finish. If you use a different brand over a light color you might get some yellowing, so be sure to test it out first. Best of luck with your project!
DeleteI have some
ReplyDeletequestions for you? Can you use a tack cloth to clean off saw dust in between sanding..I have so much old varnish to take off an old cigarette smelling cedar chest I have to clear the dust out of the way to see how the sanding is coming and second what do you put over the cedar chest knots before you paint it.
Hi Sandy, Yes you can certainly use a tack cloth. When using Annie Sloan Chalk Paint you don't need to use a primer, but depending on the wood I sometimes put on a coat or two of clear shellac prior to painting. The shellac can help stop "bleed through" and can also block residual odors. If you still notice an odor after you finish your prep work then you might want to use a stain/odor blocking primer. Good luck with your project!
DeleteAnother wonderful transformation!
ReplyDeleteThank you Pat! :-)
DeleteThat piece is simply STUNNING !! 😍
ReplyDeleteThank you Diena. I love the classic finish of black furniture.
Delete